
Quick Containerized Web Apps with Vue.js, FastAPI, and OpenAPI
Prerequisites
- Familiarity with Linux commands. On Windows, use Windows Subsystem for Linux (WSL) or install Cygwin.
- Install Node.js version 18.3 or higher
- Install Python 3.11 or higher
Recently, I needed to make a quick app to call Google Cloud functions, pause and clear task queues, and monitor storage. I already had a bunch of library code written in Python, so a FastAPI backend tied to a Vue.js frontend made sense. In hindsight, something like HTMX might have been simpler, but it's too late now 😅.
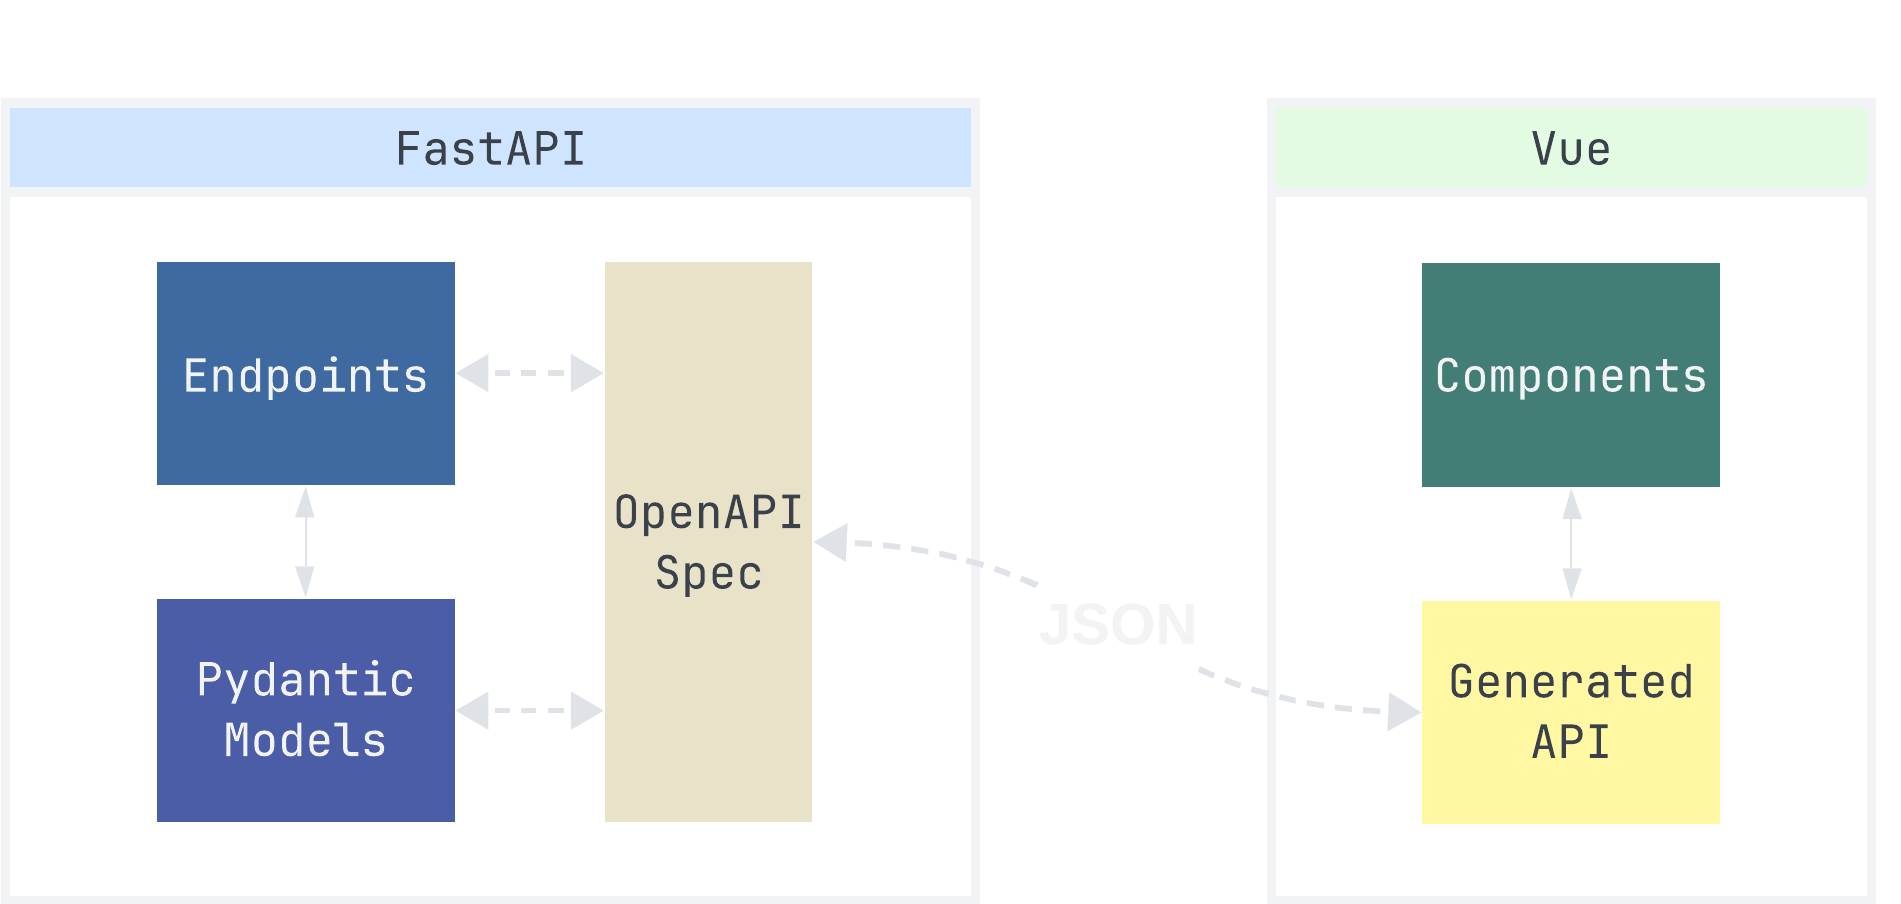
When you make a FastAPI server, the endpoints and models are automatically described in an OpenAPI specification, which a code generator can use to create a JavaScript client. This way, we can just import this generated code into Vue instead of manually rewriting any models or fetch requests in JavaScript.
We'll go through setting all of this up step-by-step, but feel free to go straight to the finished code on GitHub.
Initial Project Setup
In this section, we'll create a boilerplate Vue app and FastAPI server. The only goal is to have them run on localhost, not to communicate with each other.
We'll be making a directory structure like this:
I'm naming the root of my project vuefast, which you could replace with your own project name. When following this tutorial, commands will reference this name, so be sure to update them with your project's name.
Vue Frontend Scaffolding
We'll use the Vue CLI to create and run a new Vue project. This section is essentially the Vue quickstart with more details.
Navigate to the directory where you want both the front and backend to reside. I'll make a new directory called vuefast:
With npm we can create a new Vue+Vite project in this directory. The following command and options will make a new frontend/ folder with a default Vue app:
✔ Project name: frontend
✔ Add TypeScript? … No / Yes
✔ Add JSX Support? … No / Yes
✔ Add Vue Router for Single Page Application development? … No / Yes
✔ Add Pinia for state management? … No / Yes
✔ Add Vitest for Unit testing? … No / Yes
✔ Add an End-to-End Testing Solution? … No / Cypress / Nightwatch / Playwright
✔ Add ESLint for code quality? … No / Yes
✔ Add Prettier for code formatting? … No / Yes
✔ Add Vue DevTools 7 extension for debugging? (experimental) … No / Yes

Scaffolding project in ./frontend
Done.
Feel free to choose any options you like here, but make sure to add Typescript support. We'll need it later, and it's a real hassle to add to an existing project. Plus, you can still write regular .js files with Typescript enabled.
To finish the Vue setup, the CLI will prompt you to run the following commands:
>frontend@0.0.0 dev
>vite --host

  VITE v5.3.3  ready in 1799 ms

  ➜  Local:   http://localhost:5173/
  ➜  Network: http://172.25.32.1:5173/
  ➜  Network: http://172.31.48.1:5173/
  ➜  Network: http://192.168.1.68:5173/
  ➜  Network: http://192.168.56.1:5173/
  ➜  Network: http://192.168.99.1:5173/
  ➜  Vue DevTools: Open http://localhost:5173/__devtools__/ as a separate window
  ➜  Vue DevTools: Press Alt(⌥)+Shift(⇧)+D in App to toggle the Vue DevTools

  ➜  press h + enter to show help
Project Layout (frontend)
vuefast/
└──frontend/
    ├── public/
    ├── node_modules/
    ├── src/
    │   ├── assets/
    │   ├── components/
    │   │   ├── icons/
    │   │   ├── HelloWorld.vue
    │   │   ├── TheWelcome.vue
    │   │   └── WelcomeItem.vue
    │   ├── App.vue
    │   └── main.ts
    ├── .gitignore
    ├── env.d.ts
    ├── index.html
    ├── package-lock.json
    ├── package.json
    ├── README.md
    ├── tsconfig.app.json
    ├── tsconfig.json
    ├── tsconfig.node.json
    └── vite.config.ts
You should be able to visit localhost:5173 in your browser to see the scaffolded Vue app.
It has many default components and styles we'll need to delete later, but we do have a fully functioning Vue app on localhost. Let's set up a basic FastAPI server, then containerizing both with Docker.
FastAPI Server Scaffolding
Let's add a backend folder, into which we'll add a main.py to hold our server code and a requirements.txt to store the required libs for the project.
Project Layout (backend)
Here's a minimal FastAPI server to get things working:
Make sure to pip install the requirements:
Then use uvicorn to run the FastAPI server to see that it's working:
You should be able to go to localhost:8000 and see {"message": "Hello World"}.
We have both services running on regular dev servers, so let's containerize the app with Docker.
Containerizing
Putting both services into Docker containers will make it easier to run and deploy. We'll use Docker Compose to coordinate how the front and backend containers work together, so if you don't already have Docker installed, get it here.
Create the following files from the project's root:
Project Layout (docker)
The front and backend both get their own Dockerfiles, which Compose will use to build the images required to run the apps.
Dockerfiles
The Dockerfiles for both parts are fairly straightforward: copy files, install dependencies, and run a dev server.
For the frontend, we need a .dockerignore to ensure node_modules isn't copied into the container. We do this to make building and updating faster, and to provide a clean environment for the container.
If you're wondering why we copy package*.json for the frontend and requirements.txt for the backend separately, install them, and then copy all the code, it's because of Docker layer caching. Each command forms a new layer, so if the app's code changes but not the installed packages, then Docker can avoid reinstalling everything on update.
Docker Compose
For the docker-compose.yml, we create two services: a frontend service that runs Vue and a backend service that runs FastAPI. Check the code annotations for more details about specific lines.
services:
  backend:
    build: ./backend
    ports:
      - "8000:8000" # (1)!
    volumes:
      - ./backend:/backend # (2)!

  frontend:
    build: ./frontend
    ports:
      - "4200:4200" # (3)!
    volumes:
      - ./frontend:/frontend # (4)!
      - /frontend/node_modules # (5)!
    environment:
      - CHOKIDAR_USEPOLLING=true # (6)!
- Map your 8000 port to the container's 8000 port.
- Tell Docker to watch for changes in your ./backend directory and automatically make them available in the container.
- Map your 4200 port to the container's 4200 port.
- Tell Docker to watch for changes in your ./frontend directory and automatically make them available in the container.
- Use a "named volume" to prevent overwriting node_modules in the container—makes updates and building faster.
- Required for hot-reloading changes in the frontend
The backend service will run as is, but we need to modify the frontend's Vite run command to let us connect to container's host from outside.
In package.json add --host to the dev run command:
Finally, we can build and launch the containers with Docker Compose using the following command:
...
frontend-1  |
frontend-1  | > frontend@0.0.0 dev
frontend-1  | > vite --host
frontend-1  |
frontend-1  |
frontend-1  |   VITE v5.3.3  ready in 745 ms
frontend-1  |
frontend-1  |   ➜  Local:   http://localhost:5173/
frontend-1  |   ➜  Network: http://172.19.0.2:5173/
frontend-1  |   ➜  Vue DevTools: Open http://localhost:5173/__devtools__/ as a separate window
frontend-1  |   ➜  Vue DevTools: Press Alt(⌥)+Shift(⇧)+D in App to toggle the Vue DevTools
frontend-1  |
backend-1   | INFO:     Started server process [1]
backend-1   | INFO:     Waiting for application startup.
backend-1   | INFO:     Application startup complete.
backend-1   | INFO:     Uvicorn running on http://0.0.0.0:8000 (Press CTRL+C to quit)
You should see a bunch of build logs that settle to showing both containers running on their respective ports.
Going to localhost:5173 in your browser should show Vue frontend running again, and on localhost:8000 you'll see the backend. The difference now is both are inside Docker containers. To stop the containers, use CTRL-C.
Error connecting to Docker
On Windows, if you get an error along the lines of error during connect: Get "http://... make sure Docker Desktop is running.
Additionally, both services are hot-reloading, so editing your code locally will automatically be reflected in the containers.
We'll now work on the communication between the two apps by implementing an example app.
Writing a simple app
For the sake of simplicity, we'll make an app that can create and list todos. This should let you see how everything works together, and allow you to easily translate the functionality to your own project.
FastAPI: configuring the server
We need to add a few lines with how the server is configured. First is to add arguments when creating app:
app = FastAPI(
        title="vuefast-backend",
        servers=[{"url": "http://localhost:8000"}] # (1)!
)

# ...
- Necessary for OpenAPI to generate the required basepath
The title is just a preference, but the servers argument is necessary when generating JS code later. It establishes which host and port the FastAPI server is running on so the JS fetch requests are routed properly.
Next, even though we're running on localhost, we still need a CORS policy to allow our Vue frontend to make requests to our backend.
from fastapi.middleware.cors import CORSMiddleware

app.add_middleware(
        CORSMiddleware,
        allow_origins=["http://localhost:5173"], # (1)!
        allow_credentials=True,
        allow_methods=["*"],
        allow_headers=["*"],
)

# ...
- The host:port of the frontend
We set up Docker Compose to run our frontend on localhost:5173, so this policy allows all requests coming from the frontend.
Now we're set up to create some models and endpoints, so let's start by listing some Todos.
FastAPI: Listing Todos
For the first feature of our app, we'll make a simple way for Vue to retrieve todos from FastAPI.
Data models
Using Pydantic to model our todos, FastAPI will automatically handle validation and request/response conversion to and from JSON. A Todo just needs to inherit from BaseModel:
from enum import StrEnum
from pydantic import BaseModel

class Priority(StrEnum):
    LOW = 'low'
    MEDIUM = 'medium'
    HIGH = 'high'

class Todo(BaseModel):
    id: str
    title: str
    created: int
    priority: Priority | None = None
    completed: bool = False
I've added a priority, which is not a Pydantic model, to show later how the JS generator makes the conversion. This could be any other data in your backend, business logic, or third-party library, and shows how you can save time from having to manually duplicate your Python models in JS.
Database
Our server needs a way to store todos. Let's just use a simple in-memory dictionary:
# ...

todos: dict[str, Todo] = {} # (1)!

todos.update({ # (2)!
    '1': Todo(id='1', title='this is a todo from FastAPI', created=1, priority=Priority.LOW, completed=False),
    '2': Todo(id='2', title='this is another one 😄', created=2, priority=Priority.MEDIUM, completed=False)
})
- In-memory database for demo. id -> Todo
- Adding some temporary todos for listing
Later, when Vue creates a new todo, our server will store it in todos. Restarting the server will erase any new todos in the dictionary, but this is fine for prototyping. I've also added a couple of temporary todos so Vue has something to retrieve.
List todos endpoint
The following is an endpoint for Vue to call to retrieve all todos in the database:
# ...

@app.get('/todos')
async def list_todos() -> list[Todo]:
    return [t for t in todos.values() if not t.completed]
We're only listing the todos that haven't been completed yet. This is so when Vue completes a todo, it won't reappear on page reload.
Interestingly, the return type list[Todo] is a normal Python static type hint, but it allows FastAPI to create the correct OpenAPI spec for the JS generator.
Generating JS
Normally, at this point, you'd consider manually programming the same Python data models in JS to receive the Todo JSON in Vue.
Instead, FastAPI created an OpenAPI spec on localhost:8000/openapi.json, which contains everything a code generator needs to make the models and endpoints for us.
localhost:8000/openapi.json
// 20240806134752
// http://localhost:8000/openapi.json

{
  "openapi": "3.1.0",
  "info": {
    "title": "vuefast-backend",
    "version": "0.1.0"
  },
  "servers": [
    {
      "url": "http://localhost:8000"
    }
  ],
  "paths": {
    "/todos": {
      "get": {
        "summary": "List Todos",
        "operationId": "list_todos",
        "responses": {
          "200": {
            "description": "Successful Response",
            "content": {
              "application/json": {
                "schema": {
                  "items": {
                    "$ref": "#/components/schemas/Todo"
                  },
                  "type": "array",
                  "title": "Response List Todos Todos Get"
                }
              }
            }
          }
        }
      }
    }
  },
  "components": {
    "schemas": {
      "Priority": {
        "type": "string",
        "enum": [
          "low",
          "medium",
          "high"
        ],
        "title": "Priority"
      },
      "Todo": {
        "properties": {
          "id": {
            "type": "string",
            "title": "Id"
          },
          "title": {
            "type": "string",
            "title": "Title"
          },
          "created": {
            "type": "integer",
            "title": "Created"
          },
          "priority": {
            "anyOf": [
              {
                "$ref": "#/components/schemas/Priority"
              },
              {
                "type": "null"
              }
            ]
          },
          "completed": {
            "type": "boolean",
            "title": "Completed",
            "default": false
          }
        },
        "type": "object",
        "required": [
          "id",
          "title",
          "created"
        ],
        "title": "Todo"
      }
    }
  }
}
It might be a little confusing to look at, but if you follow the keys, you'll see that each part of our server is modeled in JSON. Our endpoints are listed under the paths key, and our models are listed under components.
Configure route naming
One thing we should change is how the spec defines our routes, which are defined under operationID keys in paths. The JS generator will use these operation IDs to name the requests and they are named redundantly to avoid conflicts.
For example, our list_todos endpoint would be named list_todos_todos_get in JS. To change how the spec generates these IDs, we can add a renaming function to the server:
from fastapi.routing import APIRoute

# ... everything else

def setup_openapi(app: FastAPI) -> None:  # (1)!
    for route in app.routes:
        if isinstance(route, APIRoute):
            route.operation_id = route.name

setup_openapi(app)
We need to call this function after all route definitions, so just stick it at the very end of main.py.
With this change, the /todos endpoint is named list_todos, the same name we wrote in Python. Much nicer.
Using the generator
There are few options for generating JS, but we'll use openapi-generator paired with typescript-fetch. The typescript-fetch generator seems to be the most concise and doesn't require any install/build process for additional packages.
The following command uses npx to run the generator. We feed it the spec on localhost:8000/openapi.json and output the JavaScript code into frontend/src/generated-api.
~/vuefast/frontend$ npx @openapitools/openapi-generator-cli generate -i http://localhost:8000/openapi.json -g typescript-fetch -o ./src/generated-api --additional-properties=useEs6=true
Generated API layout
If you navigate to frontend/src/generated-api and peruse the files, you'll see the models and endpoints we created in FastAPI have been translated into JS. You'll even notice the Priority enum we created has been translated into a JS enum.
Now, all we need to do is instantiate the API found in apis/DefaultAPI.ts, and use the functions that correspond to backend endpoints. We'll see how this works in the next section.
Vue: TodoList Component
To reduce the clutter, I'm removing some of the scaffolded files while adding a boilerplate TodoList.vue.
 frontend/
 ├── src/
 │   ├── assets/
-│   │   ├── base.css
-│   │   ├── logo.svg
 │   │   └── main.css
 │   ├── components/
-│   │   ├── icons/
-│   │   ├── HelloWorld.vue
-│   │   ├── WelcomeItem.vue
-│   │   ├── TheWelcome.vue
+│   │   ├── TodoList.vue
 │   ├── App.vue
 │   └── main.ts
 ├── ...
I've also deleted all the styles in main.css.
We need to update App.vue to use this new component:
    <template>
        <main>
            <h1>Todos</h1>
            <TodoList/>
        </main>
    </template>

    <script setup lang="ts">
      import TodoList from "@/components/TodoList.vue"
    </script>

    <style scoped></style>
Now in TodoList.vue, we'll just request the list_todos endpoint using the generated API. We accomplish this by importing and instantiating DefaultAPI and calling the listTodos method. For the HTML template, I'm just populating some divs for now.
<template>
    <div>
        <div v-for="todo in todos" :key="todo.created">
            {{ todo.title }}
        </div>
    </div>
</template>

<script setup>
import {DefaultApi} from '@/generated-api';
import {onMounted, ref} from "vue";

const todos = ref([])

const apiClient = new DefaultApi();

onMounted(() => {
    apiClient.listTodo().then(data => {
        todos.value.push(...data)
    })
})
</script>

<style scoped></style>
And the result:
When the app is mounted, we retrieve the Todos stored in the server's memory. This is cool, but making new Todos is cooler.
FastAPI: Creating Todos
Let's make a new endpoint Vue can POST some data to:
import uuid
from datetime import datetime

# ...

class CreateTodoRequest(BaseModel):
    title: str
    priority: Priority | None = None

@app.post('/todos', status_code=201)
async def create_todo(req: CreateTodoRequest) -> Todo:
    new_id = str(uuid.uuid4())
    created = int(datetime.timestamp(datetime.now()))
    new_todo = Todo(id=new_id, created=created, **req.dict())
    todos[new_id] = new_todo
    return new_todo

# ...
This one's a little different because we're defining a separate request object instead of using a Todo directly.
This is because we don't want the POSTer to fill in anything but title (required) and priority (optional). This lets the server handle creating a new id and created time before returning the new Todo. FastAPI documents this pattern in their extra models section.
To use this new endpoint from Vue, make sure to rerun the OpenAPI generator to update the JavaScript client code before continuing.
Vue: Creating Todos
The updated client code now contains a createTodo() API method, which requires title and an optional priority. We'll ignore priority for now and make an input for a title and a button to send the request:
<template>
    <!-- ... -->
    <input type="text" v-model="newTodoTitle" placeholder="Add todo...">
    <button @click="newTodo">Add</button>
</template>

<script setup>
// ...

const newTodoTitle = ref('')

function newTodo() {}

// ...
</script>
To figure out how to make the request, we need to explore the generated API. Here are the two relevant areas we need to look at:
@/generated-api
We see that createTodo() takes one required parameter that needs to satisfy the interface CreateTodoOperationRequest. If we go to that definition, we'll see another interface that contains the fields we should fill for the request.
To do this, we make a nested object that satisfies these interfaces:
<script setup>
// ...

const newTodoTitle = ref('')

function newTodo() {
    const req = {
        createTodoRequest: {
            title: newTodoTitle.value,
        }
    }

    apiClient.createTodo(req)
        .then(res => {
            todos.value.push(res)
            newTodoTitle.value = ""
        })
        .catch(err => {
            console.error(err)
        })
}

// ...
</script>
The req object satisfies the interfaces and is successfully sent to the server with createTodo.
The createTodo method returns a Promise that resolves to a new Todo, which now includes an id and created field. Once we push the new Todo into the todos array, Vue will instantly update our list to include it.
Here it is in action:
Since adding a priority and completing a Todo follow a similar flow to what we've already covered, I'll leave the rest in the GitHub repo and wrap up the article here.
Onward
On GitHub, you'll find I handled a couple more things, like priority and marking todos complete.
Feel free to read through the full code in the repo and use it as a starting point for your own app.
If you have any questions, suggestions, or fixes, feel free to drop me a line in the comments.